Troubleshooting CiscoVPN
While the CiscoVPN is required to access all Research Computing services--including the supercomputers--Research Computing does not manage or maintain the CiscoVPN: it is maintained by the Enterprise Technology (ET) group.
Below are troubleshooting steps you can take for common connectivity. If none of these steps work, please reach out to ET for support. You can try to contact them through the ASU help front desk (via your MyASU "Help" tab) or via their official contact information.
To ensure a smooth and reliable VPN connection, we recommend using the official Cisco VPN client, which can be obtained from: https://sslvpn.asu.edu. Enterprise Technology has made configuration changes and adjustments that cause compatibility/connection issues with alternative VPN clients such as OpenConnect.
OSX Systems (Macs)
“Connect capability is unavailable because the VPN service is unavailable”
This is a known issue with the CiscoVPN on OSX. Enterprise Technology (ET) has provided a patch for this, and it is available from ASU MyApps page under the heading “Is the SSL VPN failing to connect on your Mac?”
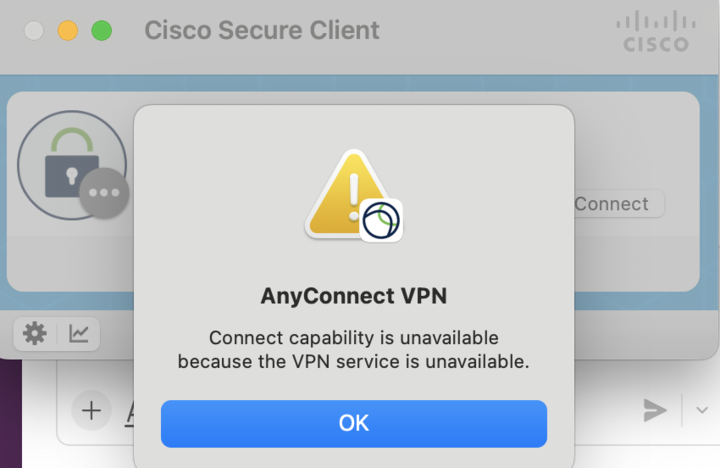
When using the patch from ET, you must right-click and select “Open” from the popup, otherwise an error will appear.
You can alternatively run the following commands in terminal:
sudo cp /opt/cisco/secureclient/bin/Cisco\ Secure\ Client\ -\ AnyConnect\ VPN\ Service.app/Contents/Resources/com.cisco.secureclient.vpnagentd.plist /Library/LaunchDaemons/

sudo launchctl bootstrap system /Library/LaunchDaemons/com.cisco.secureclient.vpnagentd.plist
If prompted about blocked actions, click “Open System Settings”, and then “Allow” to allow the CiscoVPN to install the necessary network settings. Finally, restart the CiscoVPN, and reconnect.
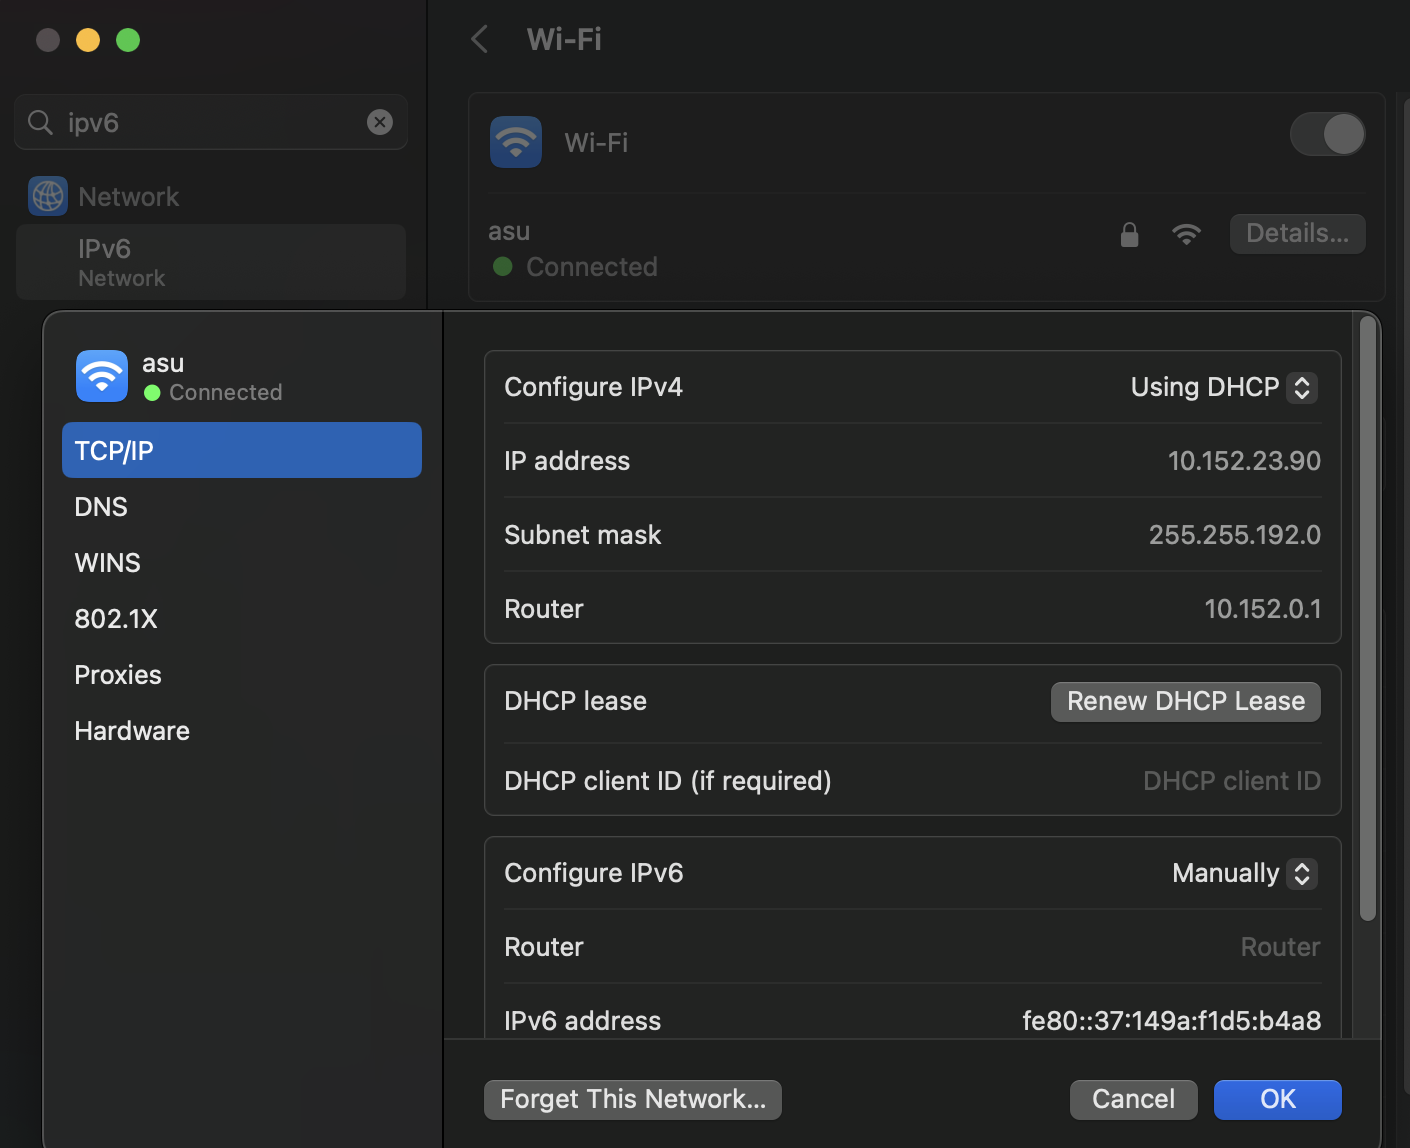
Disable IPv6 on MacOS
If you are still having issues connecting to the Research Computing services after applying the above patch, you may need to disable IPv6 on your Mac. This resolves many issues with the CiscoVPN on MacOS, particularly around DNS resolution.
In the System Settings, search for “IPv6” and change the “Configure IPv6” option to “Manually”.
Alternatively, you can run the following command in terminal to disable IPv6:
sudo networksetup -setv6off Wi-Fi
Uninstalling the VPN on MacOS
If you have to uninstall CiscoVPN, you will need to use the command line to remove it with the uninstall tool.
sudo /opt/cisco/secureclient/bin/vpn_uninstall.sh
Windows Troubleshooting
Domain name resolution is one of the primary features the CiscoVPN offers and allows your workstation to reach hosts by their simple name, such as sol.asu.edu rather than by remembering their IP address.
If you have authenticated to the VPN successfully, but cannot reach services with either SSH or the web portal, this is the likely culprit.
First, ensure that you are connected to the VPN. Once you are connected, a small globe with a lock icon will appear. Hovering over it will display the "connected" status.

Next, verify the VPN has properly adjusted the system's routing tables with the command:
route print | findstr 10.126.16.0

You should see at least one returned line, and if none are returned, then the routing table adjustments did not succeed.
Next, ping the service you are trying to connect to. In most cases--such as to connect to the Sol supercomputer--you can use this:
PS C:\Users\rcsparks> ping sol.asu.edu
Pinging sol.asu.edu [10.139.120.2] with 32 bytes of data:
The ping replies are not important, but that it does return a 10. IP address (e.g., 10.139.120.2) is the indicator of whether the DNS is working.
Correcting Network DNS settings
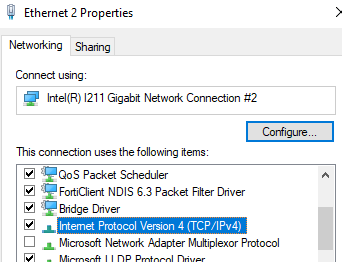
From the start menu, search for “Network status”. You should see your network adapter listed as below. Click on "Change adapter options."
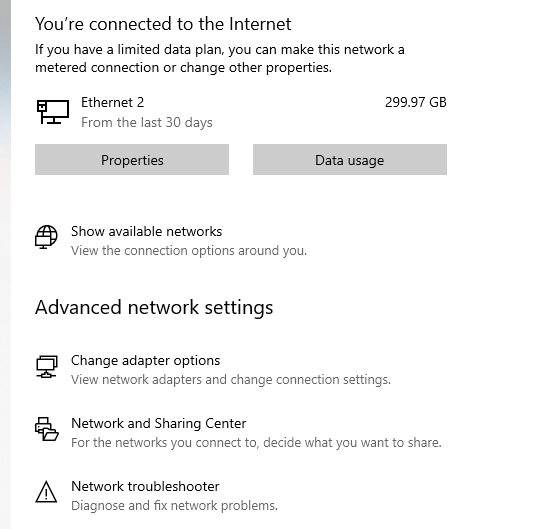
Next, select the appropriate interface and click "Properties". On a laptop, it may be a wireless connection, and on a desktop, wired connections will be identified as "Ethernet 1" or "Ethernet 2".
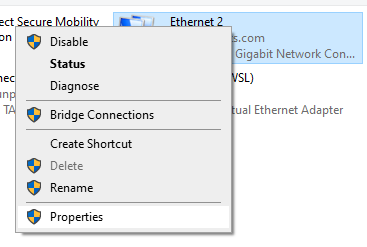
On the interface Properties modal box, select "Internet Protocol Version 4" and once again hit "Properties".
While connected to the VPN, your DNS servers should report 129.219.17.200 or 129.219.17.5.

If neither of these values are present, first confirm you are successfully connected to the VPN. Once connected, manually set at most one of the above values. When you are not connected to the VPN, the preferred value will be “Obtain DNS server automatically”.
System Software
If these above steps fail, you will need to examine additional software installed on your machine. Other VPNs, Antivirus software, or DNS redirectors will all cause issues with the VPN. Please disable any of these to start narrowing down what could be the problematic software. If disabling these softwares does not fix the problem, you will need to reach out to Enterprise Technology for assistance.
Ubuntu Linux
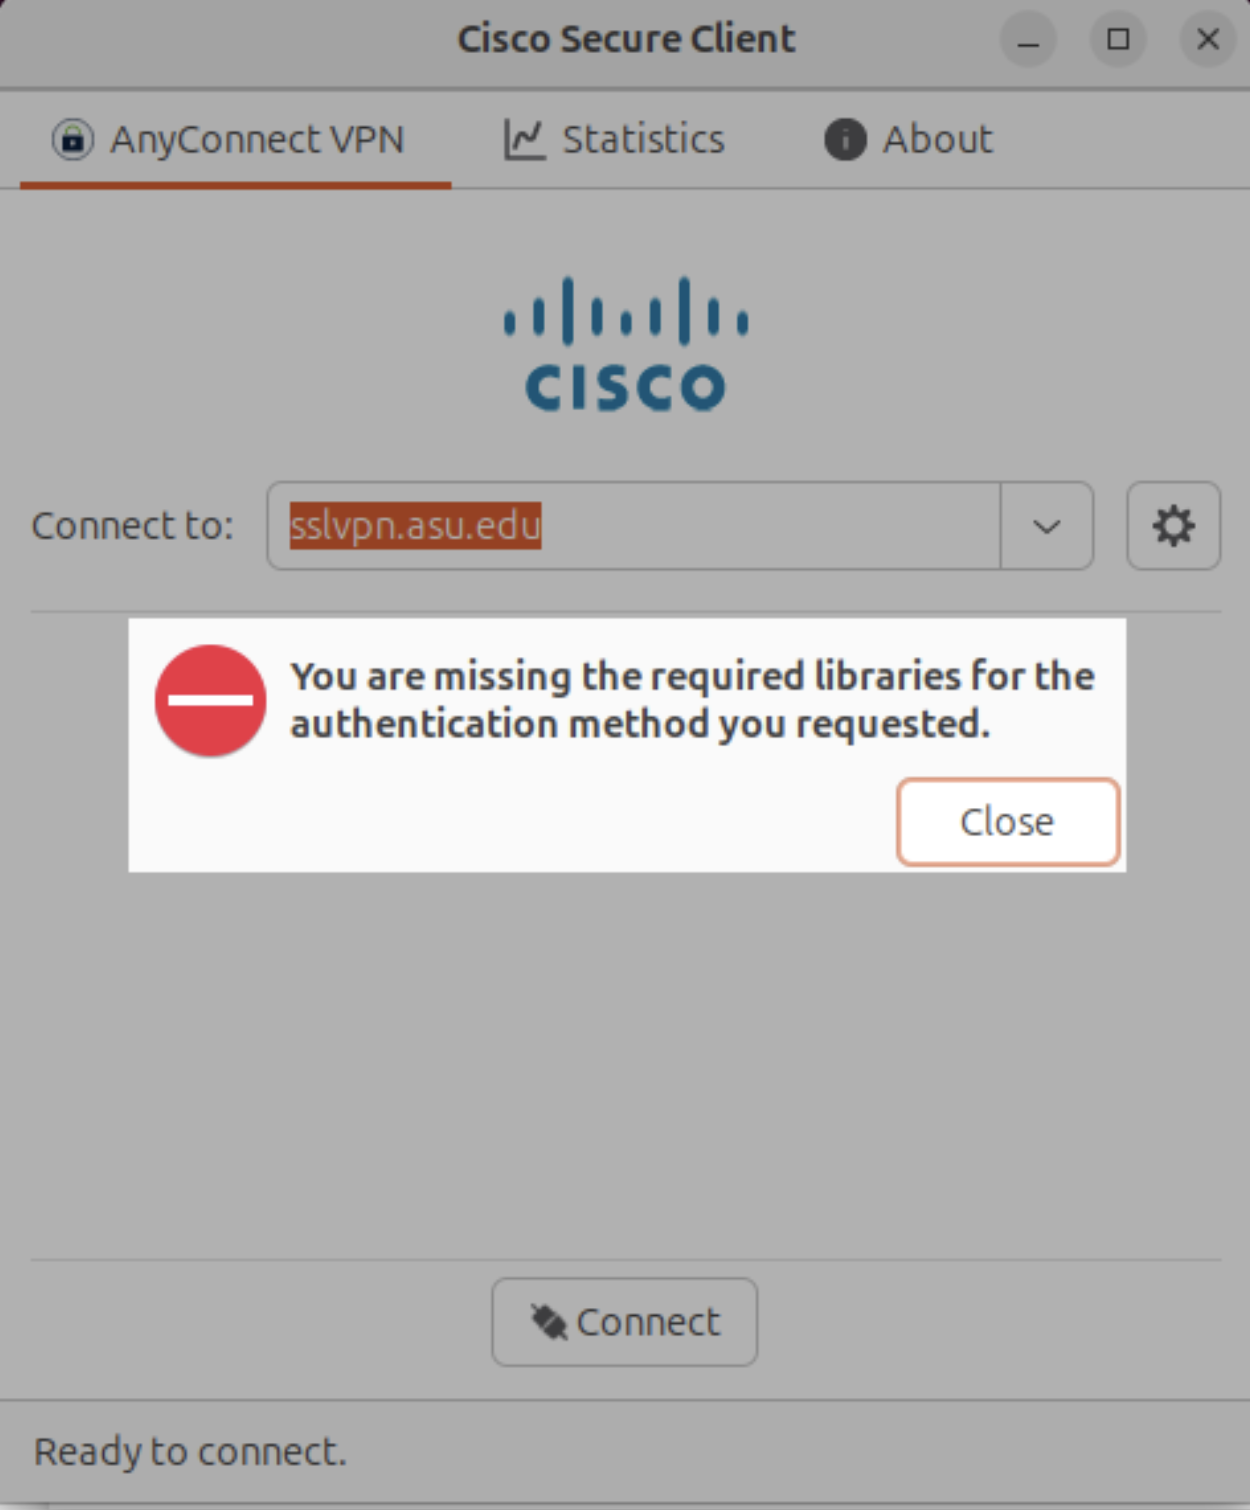
"You are missing the required libraries"
On newer Ubuntu systems, the default installation of Ubuntu and the CiscoVPN client does not include the necessary libraries required for successful VPN connections. When attempting to connect to the VPN, you may encounter the following error:
To resolve this issue, install the missing webkit2gtk library from the Jammy repository by running the following commands:
sudo add-apt-repository deb http://gb.archive.ubuntu.com/ubuntu jammy main
sudo apt update
sudo apt install libwebkit2gtk-4.0-dev
Once installed, restart the CiscoVPN client and attempt to connect again.
Additional Troubleshooting for Visiting Student Accounts
Make sure the visiting student is subscribed to the VPN service by visiting selfsub.asu.edu and confirming that Secured network access (Cisco/Perfigo) is enabled. Subscribing at the bottom of the page may be necessary.
Once subscribed, users should visit sslvpn.asu.edu to log in and download/install the CiscoVPN client. If there's an existing download of the CiscoVPN, it may need to be deleted and then re-installed. After installing the client, connect to sslvpn.asu.edu/2FA as the address and you will be prompted to log in.
The login process will ask for three inputs:
- Your ASURITE as the username
- Your ASURITE password
- "Second password"--a 2FA code for Duo Two-Factor authentication. For this, type "push" to receive a push notification, select "phone" for a call, or enter a passcode from the app or text.
WSL2 and Cisco AnyConnect VPN Internet Issue
Symptom; If you are using Windows and the Windows Subsystem for Linux, you may have issues when trying to access software repositories, such as when you do sudo apt update while on the CiscoVPN. However, updates work when the CiscoVPN is off.
Err:1 http://archive.ubuntu.com/ubuntu focal InRelease
  Temporary failure resolving 'archive.ubuntu.com'
Err:2 http://security.ubuntu.com/ubuntu focal-security InRelease
  Temporary failure resolving 'security.ubuntu.com'
Err:3 http://archive.ubuntu.com/ubuntu focal-updates InRelease
  Temporary failure resolving 'archive.ubuntu.com'
Err:4 http://archive.ubuntu.com/ubuntu focal-backports InRelease
  Temporary failure resolving 'archive.ubuntu.com'
Reading package lists... Done
W: Failed to fetch http://archive.ubuntu.com/ubuntu/dists/focal/InRelease  Temporary failure   resolving 'archive.ubuntu.com'
W: Failed to fetch http://archive.ubuntu.com/ubuntu/dists/focal-updates/InRelease  Temporary   failure resolving 'archive.ubuntu.com'
W: Failed to fetch http://archive.ubuntu.com/ubuntu/dists/focal-backports/InRelease    Temporary failure resolving 'archive.ubuntu.com'
W: Failed to fetch http://security.ubuntu.com/ubuntu/dists/focal-security/InRelease    Temporary failure resolving 'security.ubuntu.com'
W: Some index files failed to download. They have been ignored, or old ones used instead.
This is a DNS-related issue and can be solved with the following steps:
- Connect to the Cisco Anyconnect VPN first, then open Powershell as an Administrator and take note of the return values from these commands.
Get-DnsClientServerAddress -AddressFamily IPv4 | Select-Object -ExpandProperty ServerAddresses

Get-DnsClientGlobalSetting | Select-Object -ExpandProperty SuffixSearchList
- Open Windows Subsystem for Linux (WSL2):
sudo unlink /etc/resolv.conf # this will unlink the default wsl2 resolv.conf

# This config will prevent wsl2 from overwritting the resolve.conf file everytime you start wsl2
cat <<EOF | sudo tee -a /etc/wsl.conf
[network]
generateResolvConf = false
EOF

cat <<EOF | sudo tee -a /etc/resolv.conf
nameserver 10.50... # The company DNS/nameserver from the command in step 1
nameserver 10.50... # The company DNS/nameserver from the command in step 1
nameserver 8.8.8.8
nameserver 8.8.4.4
search this.searchdomain.com # The search domain that we got from step 2
EOF
- Outside of your WSL shell, change the Cisco Anyconnect metric from the default value to 6000 (from 1) using PowerShell.
Get-NetAdapter | Where-Object {$_.InterfaceDescription -Match "Cisco AnyConnect"} | Set-NetIPInterface -InterfaceMetric 6000
- Restart WSL2 within the same elevated PowerShell session, and then you should be able to open WSL2 and establish an internet connection.
Restart-Service LxssManager
These instructions are based on several sources detailing this known issue:
- WSL2, problem with network connection when VPN used (PulseSecure)
- WSL2 ubuntu 18.04 unable to connect to IP resources with Cisco Annyconnect active
Systems With Docker Installed
If you are using docker, docker's default IP addresses will overlap and cause routing issues. You must change the default networks for docker on the system otherwise the CiscoVPN routes will not work correctly. Though the specific configuration changes will vary, the general steps include:
- You need to create a file
"/etc/docker/daemon.json"with a non-overlapping private IP range. Often,192.168.x.xor198.x.x.xwill work well.
Choose the size of dockers available IP range, and then also a secondary size for each network created within the broader network. In this example, there is a /15 netmask used as the base and smaller /24 networks will be created out of this.
{
  "default-address-pools":
  [
    {"base":"198.19.0.0/15","size":24}
  ]
}
- Restart the docker service
- You may also need to run:
docker network prune